Remote Live Music-Making With JamulusFor questions, contact [email protected].
If you feel moved to give back, consider making a contribution to C4. |

|
Configuring JamulusFor information on configuring Jamulus, the official documentation is a good place to start, because it is more in-depth, and updated more frequently. We will just cover the basics here.
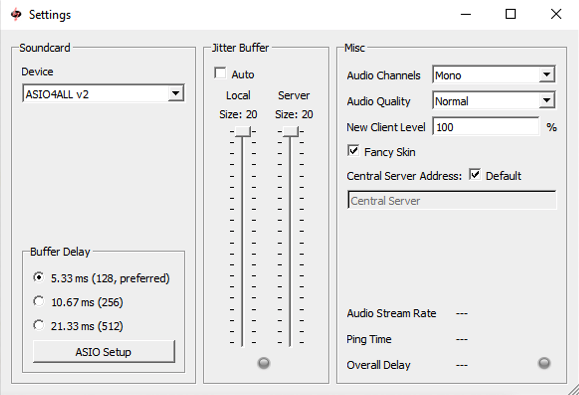
The main Jamulus window looks similar to this (assuming you have the default “fancy" skin turned on; the "skin" just determines the cosmetic look of the window). Note that the exact look will probably change over time. 
Note the three buttons in the lower left. If you have an older version of Jamulus, they will be labeled Settings, Chat and My Profile. Newer versions have Settings, Chat and Mute Myself. The first two buttons are the same in both cases. When Jamulus added the Mute Myself button, the My Profile button was moved to the menu bar.
Start by choosing View > My Profile from the menu bar (in newer versions) or clicking My Profile (in older versions), which will let you configure the identity you communicate to the server, so everyone else can identify you. You only need to set this once. Once you have set your desired values, click Close to close that window. Now click the Settings button to open the Settings window (it may already be open). 
There is complete official documentation about this window, so we will just give a brief description.
Soundcard SettingsThe section on the left, labeled Soundcard, determines what Jamulus will use as its input and output. The correct setting depends on your computer setup. If you are using the built-in headphone and microphone, the default setting should work. If you have an audio interface, select that. You can independently select where the input should come from and where the output should go. It gives you all possible combinations in the dropdown menu, which is a little difficult to read through, but usable. The buffer delay setting in the lower left can be left on the middle setting unless you are encountering problems with your audio interface, in which case you should set it to the bottom setting, 10.67 ms.
ASIO4ALL (Windows Only)On Windows, if you don’t see the correct device in the Device dropdown, you will probably need to download and install the ASIO4ALL driver. It will then appear as a Device choice. Select it, then press the ASIO Setup button at the lower left, as shown below.
This will bring up the ASIO4ALL control panel.

The WDM Device List on the left side select the input and output devices to be used. If you don’t immediately see the little plus sign expansion boxes to the left of the devices in the WDM Device List, which let you select inputs and outputs independently, click the wrench icon in the lower right to pull up the advanced options. That should give you the capability to mix and match input and output devices.
In the screen show below, for instance, the input is coming from HD Webcam C310, and the output is going to Realtek HD Audio output. 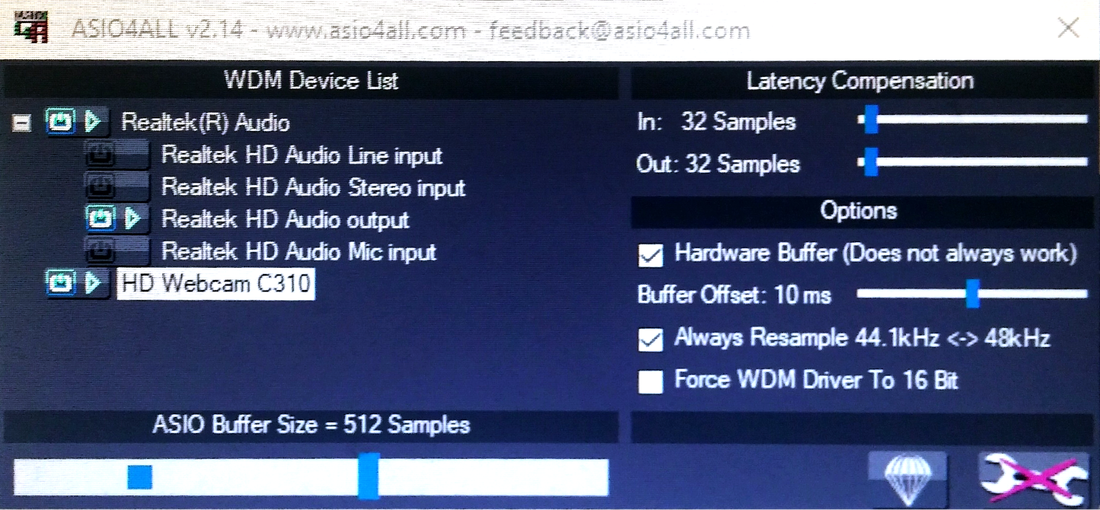
Recently, we have started to see more complicated WDM Device List trees, with additional tree levels that you need to configure. The trick is to highlight exactly the right options so that the correct blue buttons are lit up. For instance, one user had this incorrect setup:

To get the built-in microphone and speakers to work properly, the following 4 entries needed to be lit, and all others turned off:
Realtek High Definition Audio(SST) Realtek HD Audio output with SST Out: 2x 44.1-48kHz, 32Bits Realtek HD Audio Mic input One participant was unable to get their sound to work until they highlighted their input device (here, it’s HD Webcam C310), clicked on the wrench in the lower right to pull up advanced options, and checked “Hardware Buffer (Does not always work)”. Jitter Buffer SettingsThe section in the middle of the Jamulus Settings window determines how much buffering Jamulus does to compensate for connection problems. We will discuss this later. For now, you can leave the Auto checkbox checked, to let Jamulus decide a good compromise setting.
Misc SettingsOn the right, you can set various other things:
At the bottom are diagnostic values about your connection. We will return to these after you have connected. Then just close the settings window. |